
The FeedBack DataLogger from Tramex can help identify humidity issues, saving you from possible floor failures with anhydrite screeds. When it comes to talking about drying screeds and concrete floors in general, there seems to be an elephant in every room: ambient humidity. Although it’s mentioned in every datasheet, handbook and national standard, ambient humidity seems to be overlooked or misunderstood by many architects, builders and flooring installers. As a rule-of-thumb, concrete slabs are expected to dry at a rate of 1mm per day (or an inch per month) and anhydrite screeds the same up to 40mm, or two days per mm when poured deeper (ie a 60mm screed will take: 40mm @ 1 day = 40 days + 20mm @ 2 days = 40 days which = 80 days in total).
Ideal Concrete Drying Conditions
‘Ideal conditions’, as stated by screed manufacturers in their guidance literature, are usually agreed on as being in the region of 20deg C and 40-60% RH. These are the optimum conditions to allow the moisture within the slab or screed to evaporate from the surface. The rate of evaporation will depend on ambient conditions. Warm, dry, flowing air will allow for faster evaporation. These conditions, while ideal, are obviously not the normal state of a building site in the UK for most of the year, except the three short months of summer, at which time doors and windows should be thrown wide open to create a good flow of dry air, lifting moisture from the material and carrying it away. However, for the rest of the year, when temperatures are closer to 5deg C and humidity upwards of 70-80% RH, leaving doors and windows open will have the opposite effect, instead introducing more humidity into the environment and slowing the drying further. Then, with the addition of wet trades applying plaster to the walls, humidity in the air is raised even higher. At most times of the year, heaters and dehumidifiers are needed to artificially create those ‘ideal conditions’. Building sites which aren’t artificially conditioned will maintain a high humidity level and, when temperatures drop (overnight for example), can easily reach dew point, resulting in condensation settling on the surface of the floor, thus wetting and re-wetting the screed.
The Use of Damp Proof Membrane
An obvious solution in this instance, and one which seems to be the go-to quick fix in the UK today, is the use of a damp-proof membrane (DPM). This will slow the rate of drying of the floor to a level which isn’t harmful to the floorcovering. DPMs can be ideal for this scenario (a sort of get out of jail card) and also in the situation where an older floor which was installed many years before, is still showing high levels of moisture. Moisture in a slab or screed should continue to dry slowly over many years even with floorcoverings installed and so an older floor shouldn’t be expected to read as high as a new floor which is emitting its construction moisture. If a reading which would be regarded as normal for a new floor, is found in an older floor, it could be an indication that there’s a breach in the damp-proof course (DPC) or even that one was never installed. Again, this can be an ideal situation for a DPM which will ensure moisture, intruding from below the slab, isn’t going to cause a failure. (Be sure, in this case, to select a DPM which is suitable for residual construction moisture as well as groundwater vapor). Once a DPM is installed, however, it becomes even more important to monitor the ambient conditions on site leading up to the floor cover installation. This is because when the condensation point is reached, in normal circumstances as described above, most of the condensation is absorbed into the surface of the screed, whereas with a DPM in place, this condensation will sit on the surface with nowhere to go. This means even a small trace of moisture can cause problems for the adhesive.
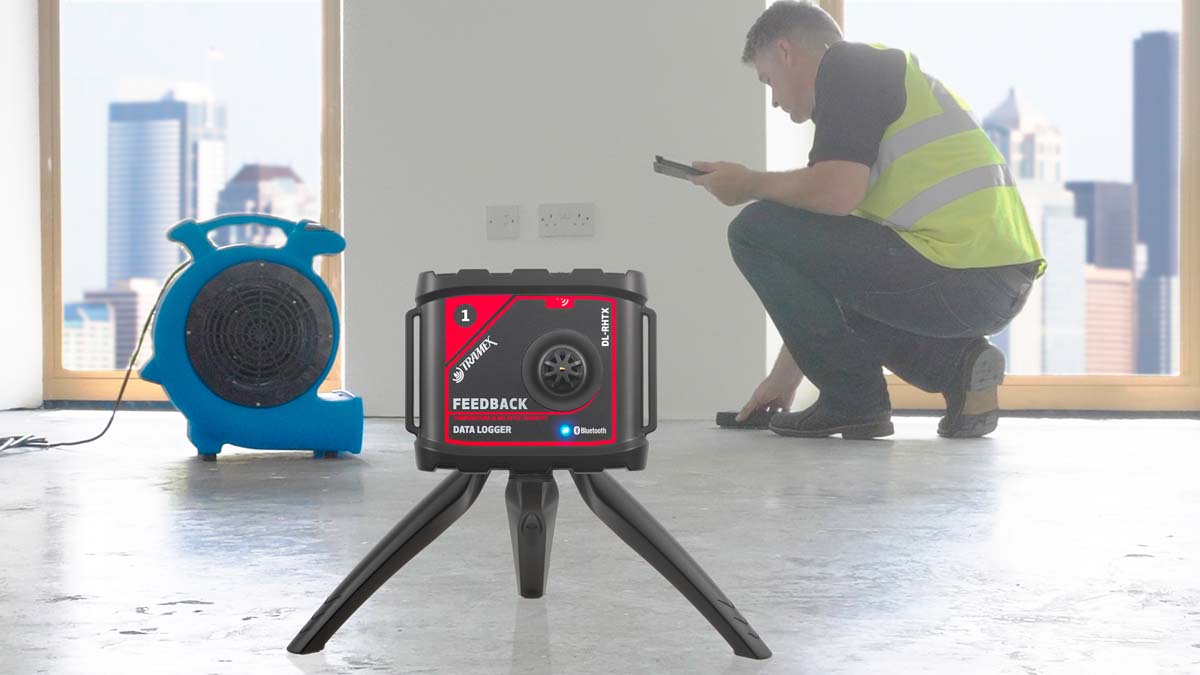
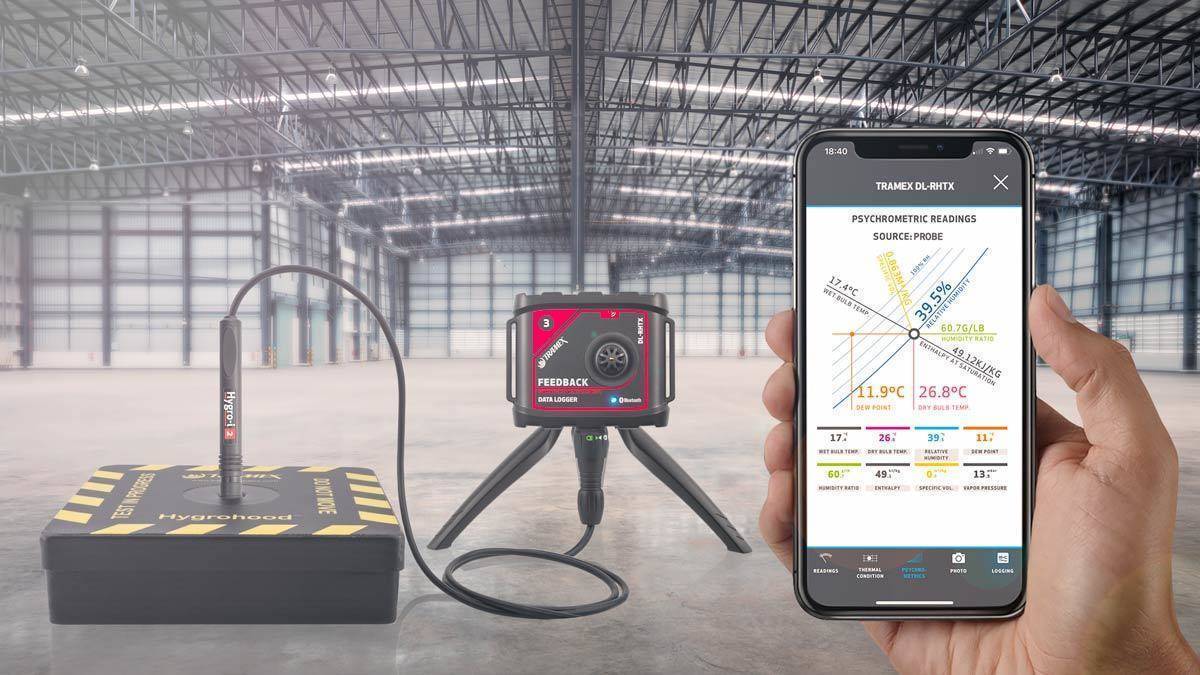
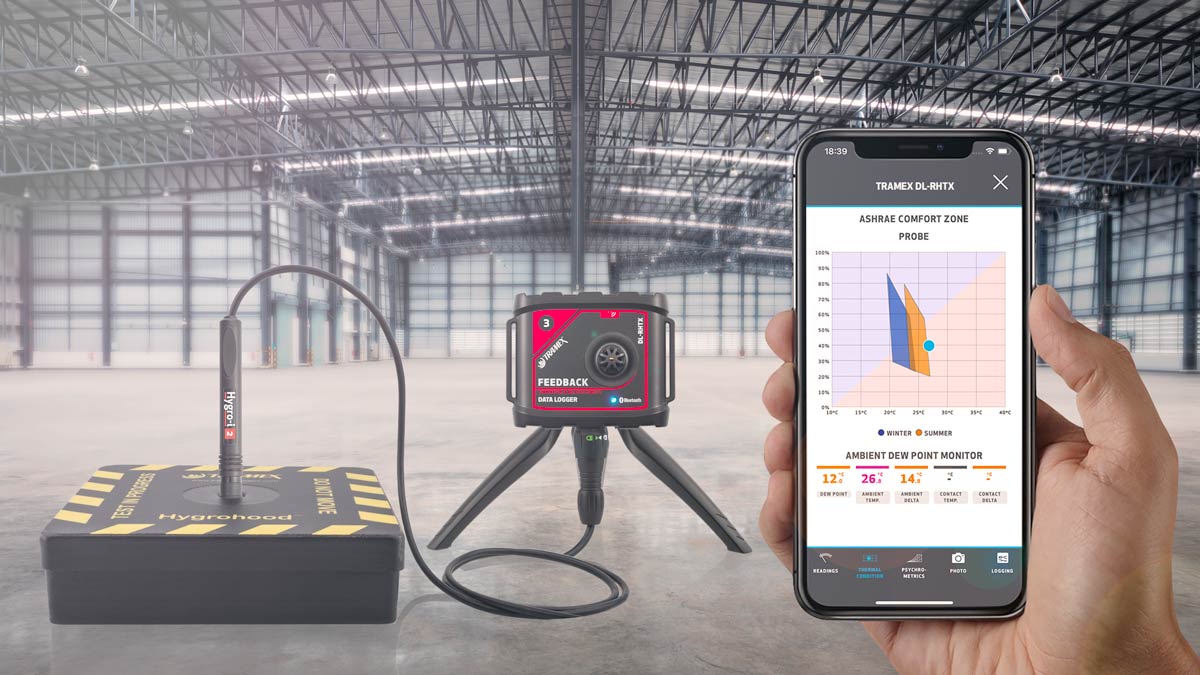
This consequence of the use of a DPM is often overlooked. The Tramex Feedback datalogger, for example, is a suitable tool for monitoring these ambient conditions over the course of the drying stage of the floor and right up to and during the installation. Readings of ambient temperature, humidity and dew-point are recorded by the device and read from a smartphone or tablet using the Tramex Meters app. Anhydrite screeds are sensitive to high ambient humidity conditions and readily absorb moisture from the air, slowing or blocking the drying completely. Removal of the laitance from the surface of the screed after the initial curing will allow the surface to release its moisture, whereas not sanding/abrading the surface will normally result in the laitance hardening and making it significantly more difficult to remove at a later stage. While some anhydrite screed installers will return to site after the initial curing period and remove the laitance as part of their service and will hand a copy of the instructions over to the contractor, ensuring everyone is aware what type of screed it is and how to treat it, these highly professional screeders are the exception and unfortunately not the rule. The more common scenario sees the contractor arriving to site with no idea that this is an anhydrite screed and therefore how to treat it. Knowing the screed is anhydrite will have important ramifications on several aspects, including choosing which type of DPM to use. DPMs designed for concrete and sand/cement screeds are usually not suitable for use with anhydrite screeds. Manufacturers are now producing DPM products for use specifically with anhydrite; however, most cannot be used when underfloor heating (UFH) systems are installed.
Moisture Testing of Anhydrite
Moisture testing of anhydrite screeds is another issue which causes confusion for contractors as these screeds do behave differently to concrete and sand/cement screeds. The three main tests in use in the UK are the British Standard humidity box, such as the Tramex RH Hood, non-destructive electronic moisture meters, such as the Tramex Concrete Moisure Encounter 5 and the Tramex Moisture Encounter X5, and the German (DIN) standard carbide method (bomb test or speedy test). The British Standard humidity box measures the ERH or equilibrium relative humidity of the screed. This is performed by affixing a specially designed sealed box to the surface of the screed with butyl tape (which, unlike silicone, doesn’t affect the RH readings) in a location of the floor which reads highest with a preliminary electronic concrete moisture meter test, like the CME5 or CMEX5. Ensure the box is out of the way of direct sunlight or drafts from open doorways. Equilibrium is achieved when the trapped air inside the box is no longer receiving humidity from or giving it to the screed. At this point a measurement should be taken.
75% RH or below is a commonly acceptable result. The length of time required for the airspace inside the box to achieve equilibrium with the slab or screed depends on its thickness and whether a screed is bonded to the subfloor or not. In the case of anhydrite screeds, which are usually poured to a depth of between 40-60mm and are normally placed over insulation, British Standards recommend a first reading is taken after four hours, and equilibrium may be assumed when two consecutive readings taken at four-hour intervals show no change. In practice this test method is often reported to be performed unsatisfactorily.
For example, many testers will leave the box in place for too short a time and it’s rare to hear of anyone checking readings twice at four-hour intervals. The reason for taking subsequent readings four hours apart is to ensure the recorded reading is taken during a period of equilibrium. A small change in ambient temperature will have a dramatic effect on the readings, destabilising the fine balance of equilibrium inside the box and sending the RH reading up or down depending on the temperature change. This fluctuation in temperature can result in an unpredictable spike in RH (eg from between 72-82% as in figure 1) as the equilibrium is upset. Stability will only resume about three to four hours later. For this reason, users of this test will often take a reading in the morning which reads high and possibly another in the afternoon which reads low and wonder which is correct, causing further uncertainty. But this uncertainty can be overcome. Verification of the humidity box test results is easier when used together with a datalogger such as the Tramex Feedback.
The external probe is placed into the box and monitors the temperature and humidity readings for the entire duration of the test, thus showing clearly when equilibrium was achieved and what the correct reading was at the appropriate time. Electronic moisture meter testing is non-destructive and provides instant readings. A purpose-built concrete moisture meter such as the Tramex CME5 and CMEX5 provides more helpful readings (of moisture by mass in concrete and cementitious screeds) than a general purpose, comparative moisture meter.

This method of testing allows the user to map a whole area, very quickly assessing the moisture condition and locating the highest reading points for further testing with more elaborate, time-consuming methods (such as the humidity box test already described) when such methods are required. When testing anhydrite screeds with an electronic moisture meter it’s essential the laitance has been removed from the surface of the screed to gain a meaningful reading. The laitance acts as a barrier or skin, trapping moisture at the surface of the screed, therefore producing a false positive reading on the instrument which is designed to take a correct measurement based on the drying curve of the slab/screed in normal drying conditions. For the same reason it’s important ambient humidity conditions are within the normal range of between 40-60% to avoid condensation which can also lead to false positive readings.
The CM Test
The CM test (known as the bomb test or speedy test in the UK) is the German national standard test and is required as a final certification of moisture conditions of slabs/screeds in many European states. The CM test involves removing a sample of the slab/screed with a hammer and chisel and crushing it using a mortar and pestle, then weighing the required amount and placing into an airtight chamber together with calcium carbide which, when in contact with moisture, produces acetylene gas. The higher the concentration of moisture the more gas is produced which is read as pressure from the devices gauge. This test is ideal for certain proprietary and fast drying screeds which act by chemically binding most construction moisture and therefore cannot be tested with relative humidity or electrical impedance devices which will give high results. In theory the CM test is the most suitable for anhydrite screeds owing to the chemical nature of the test, showing only ‘free’ moisture which can cause floor failure. In practice, however, the test is easy to get wrong and requires a good deal of knowledge and skill to get exactly right. Common user errors include:
1. Taking a sample using a drill (which produces heat and therefore removes moisture from the sample). Instead, a hammer and chisel should be used to remove a portion of the slab/screed and breaking the core open to access a representative sample.
2. Not allowing enough time for the reaction between the moisture and the calcium carbide. The process of performing the CM test involves shaking and resting the container intermittently for a period of about 10 minutes, whereas often users will allow less time which can result in a lower reading.
[View the full article in The Specifiers Guide - Flooring 2018](https://www.specifiersguide.co.uk/flooring/2018/05/25/moisture-problems-in-subfloors/ "")